Demonstration
General functions
Main Window
The main window of PROPheT is separated in six parts, which are (Fig.1.):
- The Menu bar - includes all the main functions of PROPheT, such as the different types of search (population methods), importing (loading) and exporting MM models, editing general preferences, etc.
- The Preferences Toolbar - links directly to the corresponding tab of Preferences window, for editing/viewing the selected parameters. Any change made in parameters of Preferences window is stored in PROPheT’s database. The current state of preferences is taken into account by the software in order to perform the population process according to user’s needs.
- The Summary Table - displays information regarding the current MM and EM model, as well as the number of classes, instances and data properties included in loaded MM.
- The Graph Area - displays the current MM ontology, in a form of tree diagram.
- The Main Functions Toolbar - links directly to the different population methods that are available in PROPheT.
- The Search Text Utility - performs instant search within the MM ontology and highlights entities that contain the search terms.
- Some general Handling buttons - which perform selection/expanding actions as well as their corresponding reverse actions, right directly to the ontology visualized in the Graph Area.
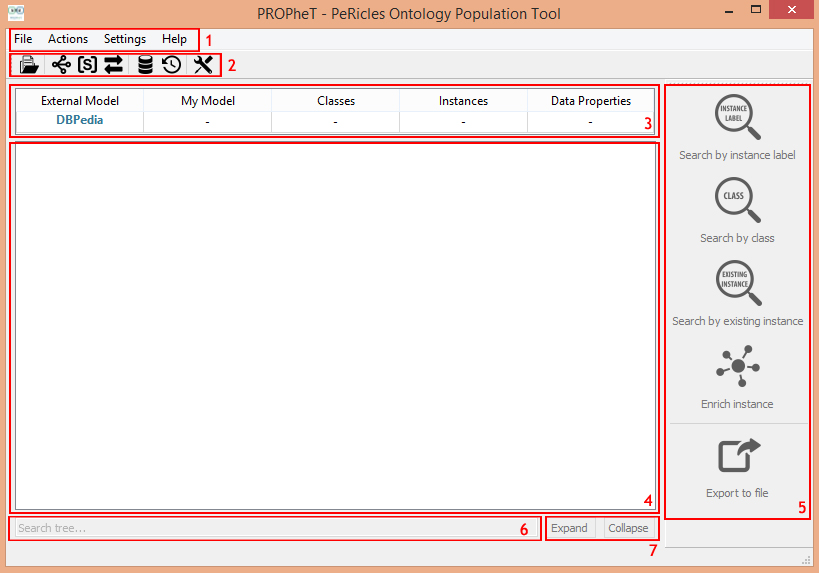
Fig.1: The main window of PROPheT and its sub-areas.
Load an ontology
The first step that a user needs to follow, while opening PROPheT, is to load an ontology (menu File > Load Model or by clicking the  button in the Preferences Toolbar). The loaded ontology will serve as the MM model in the population process.
From My models tab in the Preferences window the user may select an existing MM (already stored in PROPheT’s database) or add a new model by inserting the name and the URL (remote or local) of the model to the corresponding fields in the dialog window (Fig.2). Selection is finalized by selecting the entry and clicking on the Load button.
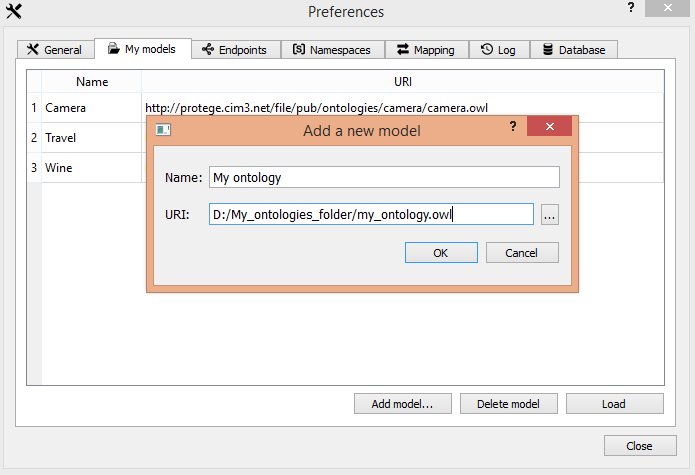
Fig.2: Inserting a new model in PROPheT.
For the purposes of this demonstration, all examples are performed on the basis of a PROPheT’s sample ontology named ‘My ontology’.
View content of ontology
After loading the ontology to be populated, the following information will be displayed (Fig.3):
in the Summary Table, the user may see the number of classes, datatype properties and instances that are declared in the selected ontology.
in the Graph area, the user may see the contents and relations existing in the loaded ontology. These are visualized in the form of a tree diagram, with three different levels:
- the class level which displays the MM classes (example entry ‘Class: <ontology_URI [1]> class_name’),
- the instance level which displays class(es) instantiations, if they exist in ontology (example entry ‘Instance: <instance_URI> instance_name’), and
- the property/value level* which displays the properties and values that are attached to aforementioned instances (example entry ‘Property: <property_URI> property_name’ ‘Value: some_literal_value [2]’).
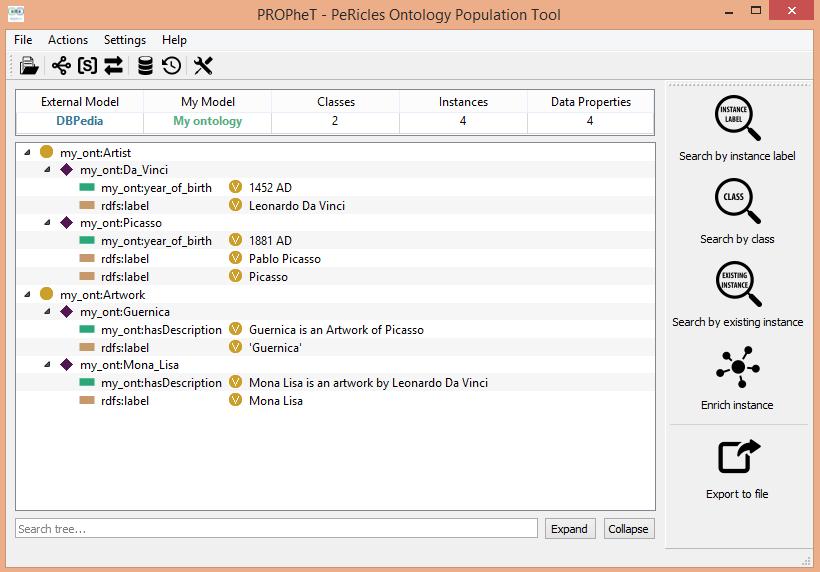
Fig.3: The main window of PROPheT with displayed information of loaded ontology.
By right-clicking into any of the tree nodes, the user may take advantage of several actions appearing in the context menu, such as: view the selected entity in browser (based on its defined URL [3]), copy its content to clipboard, or even delete the contents of the selected entity.
Furthermore, by using the Search Text Utility the user may navigate through nodes that contain the typed text; when search term is typed, an instance search is performed in current ontology and content is highlighted with blue text.
| [1] | ontology_URI, or similarly instance_URI and property_URI, can be either in the form of http:// or of a predefined prefix (see Known namespaces section) |
| [2] | alphanumeric value |
| [3] | this action makes sense when URL is remote (with available http:// reference) and not local. |
Select endpoint
As a next step, the user has to define the EM (with an existing SPARQL endpoint) from which the instances will be derived. This action can be performed by selecting Settings > Select Endpoint URL from the Menu bar or by clicking the  button in Preferences Toolbar. Similarly to My models tab, in Endpoints tab the user may select one of the existing (stored in PROPheT’s database) endpoints or add a new one, like for example the Linked Movie Database endpoint [4] as seen in Fig.4:
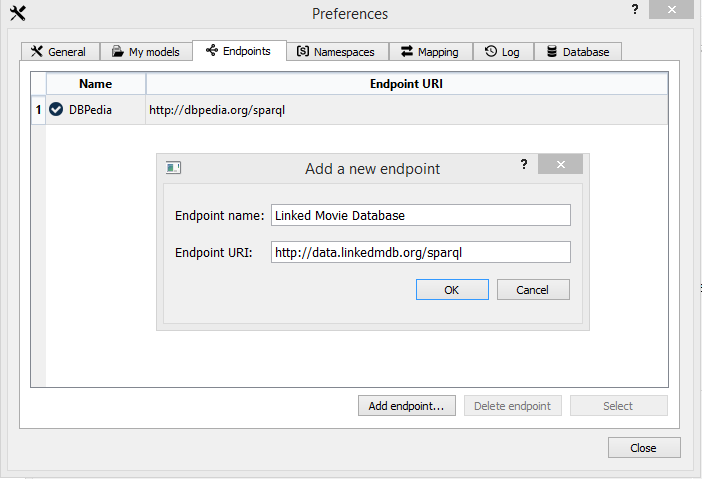
Fig.4: Adding a new endpoint in PROPheT.
For the purposes of this demonstration, DBpedia [5] will be defined as the EM, with queries served from its SPARQL endpoint (http://dbpedia.org/sparql). It should be noted that when PROPheT is used for the first time, DBPedia is the default and the only existing endpoint in PROPheT’s database.
| [4] | http://www.linkedmdb.org/ |
| [5] | DBPedia (http://wiki.dbpedia.org/) is a crowd-sourced community effort to extract structured information from Wikipedia and to make it available on the Web. |
Define general parameters
From the General tab in the Preferences window (menu Settings > Preferences or by clicking the  button in Preferences Toolbar) the user may determine the functionality of PROPheT concerning three different issues (Fig.5):
- Select whether to check for updated version of PROPheT at startup or not.
- The maximum number of derived results when searching for instances in EM; default value is 10, while the larger the number of queries’ results, the greater the endpoint’s response time.
- Define if populated instances in MM will be linked with original instances in EM; if linking mode is enabled, then the user should define the property (
owl:sameAsorrdfs:seeAlso) by which the connection will be instantiated in the MM ontology. There is no linking mode selected by default. - Select if properties that are aligned as similar in the mapping process are also defined as equivalent in the populated ontology, through the use of
owl:equivalentToproperty. - Select if
rdfs:labelannotation property will be attached to populated MM instances, whenever available in EM instances. By default, PROPheT importsrdfs:labelto populated instances.
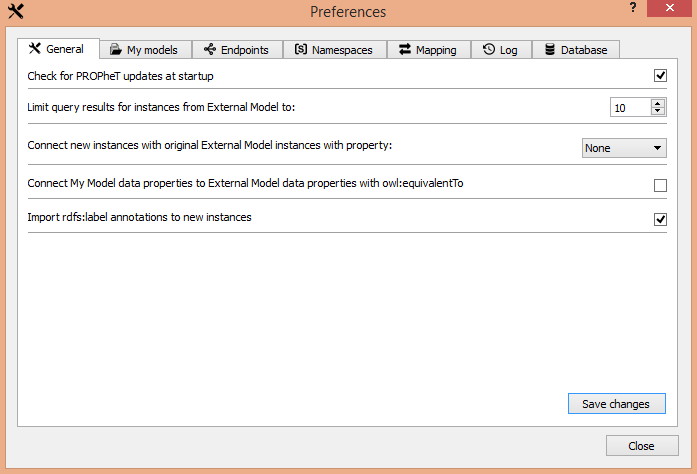
Fig.5: The General tab in the Preferences window of PROPheT.
Known namespaces
The Namespaces tab in the Preferences window (menu Settings > Edit namespaces or by clicking the  button in Preferences Toolbar) enlists a number of known DBPedia [6] namespaces (with a unique prefix and its corresponding URL per known ontology). The user may add, edit or delete a namespace, or else restore the list to PROPheT’s default namespace list.
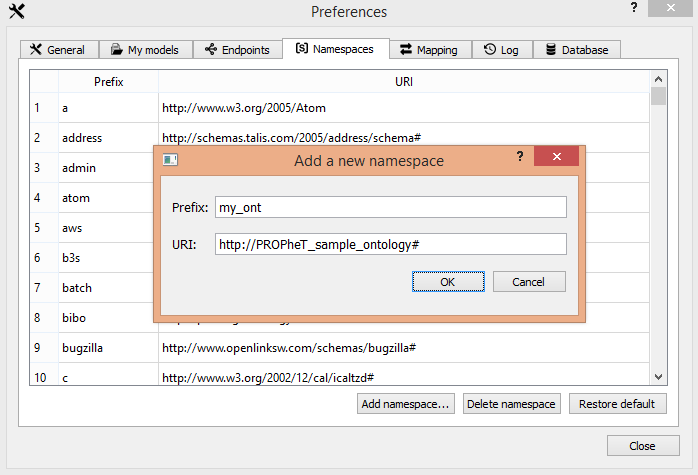
Fig.6: Inserting a new namespace in PROPheT.
Having the prefix of an ontology stored in PROPheT’s database simplifies the way of referring to its entities’ URIs; for example, given the new namespace shown in Fig.6, the class named ‘Artist’ of PROPheT’s sample ontology will be transposed from ‘http://PROPehT_sample_ontology#Artist’ to ‘my_ont:Artist’ (see Graph Area in Fig.3).
| [6] | http://el.dbpedia.org/sparql?nsdecl |
Ontology mapping
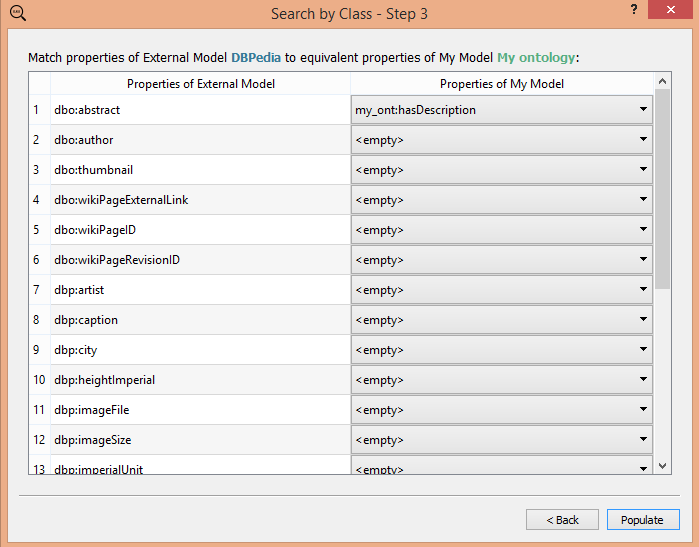
In order for the user to proceed with the population of new instances in MM, a user-driven ontology mapping process should be followed in PROPheT. For that reason, a list of all unique datatype (owl:DatatypePropert) properties that are attached in EM selected instance(s) is displayed, and the user has to define at his/her own discretion, their mapping into existing datatype MM properties (examples shown in Fig.13, Fig.18, Fig.25 and Fig.29).
The user-defined mappings are stored/updated in a local database in PROPheT and, when needed, are taken into account for proper instantiations of new individuals (instances) in MM. Through the utilization of the stored user-defined mapping table (Fig.7), it is ensured that newly populated instances in MM will carry all relevant information (values) from those properties/values of instances in the EM.
Current list of mappings can be seen from menu Settings > Edit mappings or by clicking the  button in Preferences Toolbar.
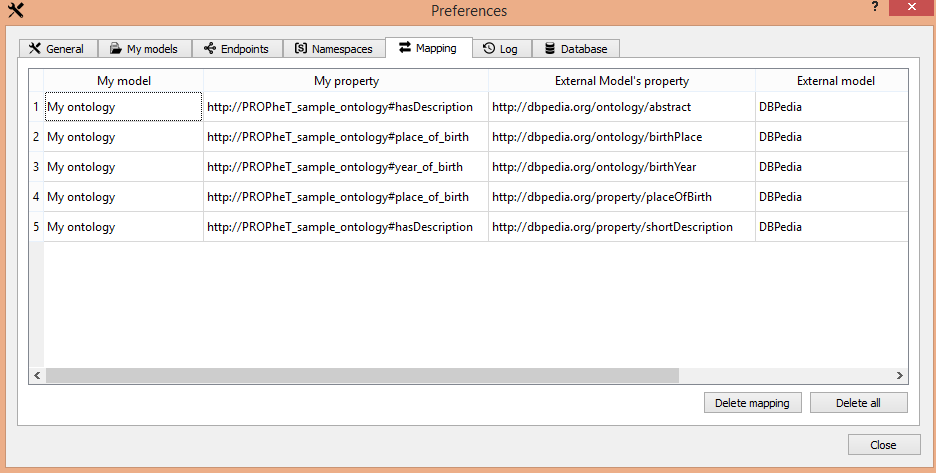
Fig.7: List of current mappings as defined by user in PROPheT (Mapping tab in the Preferences window).
PROPheT’s database
There is a default database in PROPheT where models, endpoints, namespaces and mappings are stored. Statistics of the default database can be displayed either from menu Settings > Database actions or by clicking the  button in Preferences Toolbar. An indicative screenshot of Database statistics is given in figure below.
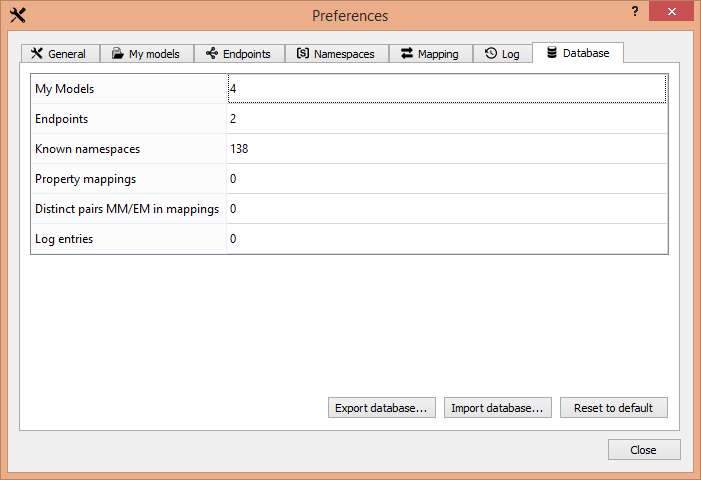
Fig.8: Screenshot from initial state of PROPheT’s database.
Every change/selection made by user in the Preferences window (setting different limits in derived results, adding/removing MM and EM sources or namespaces, etc.), or through main functions in PROPheT (adding/removing user-defined mappings, etc.), is recorded in corresponding fields of PROPheT’s database for further use by the program.
The user may export/import PROPheT’s database (.sqlite file) or, if needed, to reset it to its default.
Export populated ontology
PROPheT provides a mechanism for storing the already processed/populated MM in a local file (menu File > Export model to file or by clicking the  button in Main Functions Toolbar). A corresponding dialog window appears where the user may select the name, type, and local path where the file will be stored; allowed ontology formats are: .owl, .rdf, .ttl, .nt and .nt3.
View log entries
The user may monitor the log entries that are recorded in PROPheT for every important action, either from menu Settings > View log or by clicking the  button in Preferences Toolbar. A screenshot of log entries is displayed in Fig.9, with reference time and general description of each recorded action.
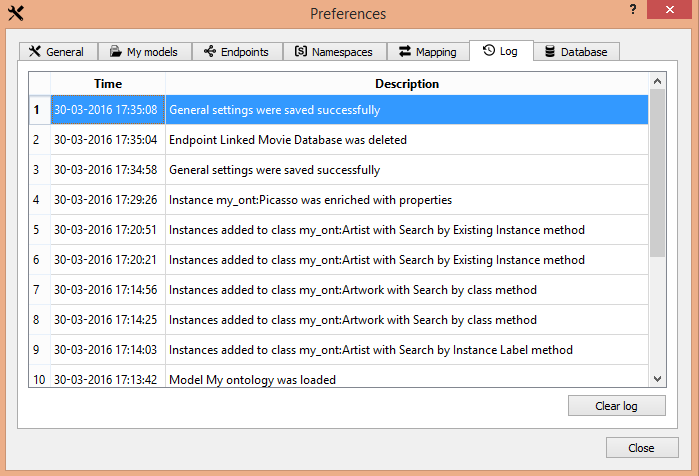
Fig.9: Screenshot of log entries in PROPheT.
Population functions
Search by Instance label
In order to perform a search based on a user-typed instance label, the user has to:
Have already loaded the ontology to be populated (see Load an ontology section).
Confirm that the selected endpoint is the one needed to be queried for new instances (see Select endpoint section).
Refine (if needed) the general parameters (see Define general parameters section).
Run the Search by instance label wizard in PROPheT (menu Actions > Search endpoint by instance label or by clicking the
 button in Main Functions Toolbar), where additional steps will be followed:
- Type a label text to search for instances in EM, proceed with available search parameters and press the Search button.
- Select one or more instances from the derived results to be populated in MM or, if no results found, go to previous step of wizard and perform a new search.
- Define a class in MM as the type (
rdf:type) of selected to be populated instances. - Do the mapping between available EM and MM datatype properties.
- Press the Populate and then the Finish button.
Search by instance label - In detail
Let’s consider a case where the user wants to add a new instance in class my_ont:Artist; he/she wants to search for entries in DBPedia regarding Vincent van Gogh [7]. The user types a text in corresponding field and PROPheT will search for instances in EM that match their rdfs:label with the user-typed label. The user may also define additional search parameters such as:
- if the user-typed label should match exactly (Exact match radio button) with
rdfs:labelvalue of found instances (see Fig.10), or - if the user-typed label should be contained in text (Contains term radio button) of
rdfs:labelvalue of found instances (see Fig.11). The search could also be case sensitive or case insensitive, according to the value of the corresponding checkbox.
In both aforementioned ways, the user may additionally select (from a list) a language in which the value of rdfs:label of the matched instances should be defined, or else to leave this parameter empty, meaning that no specific language declaration is needed in rdfs:label of resulted instances.
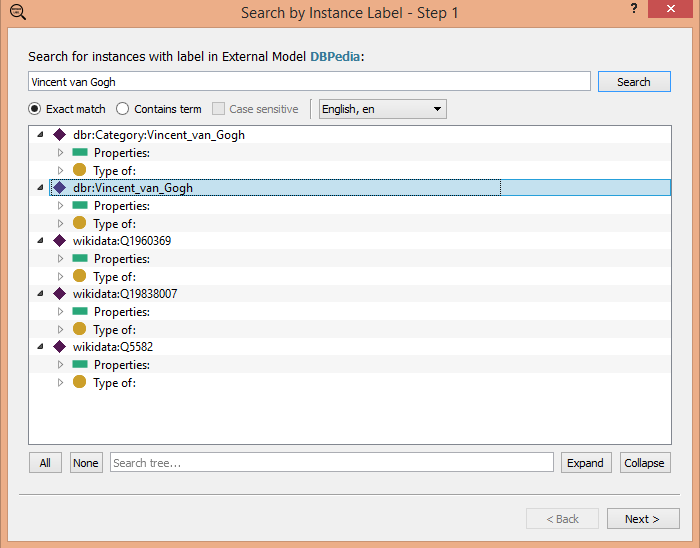
Fig.10: Results when searching for instances with exact match of ‘Vincent van Gogh’ label in English language.
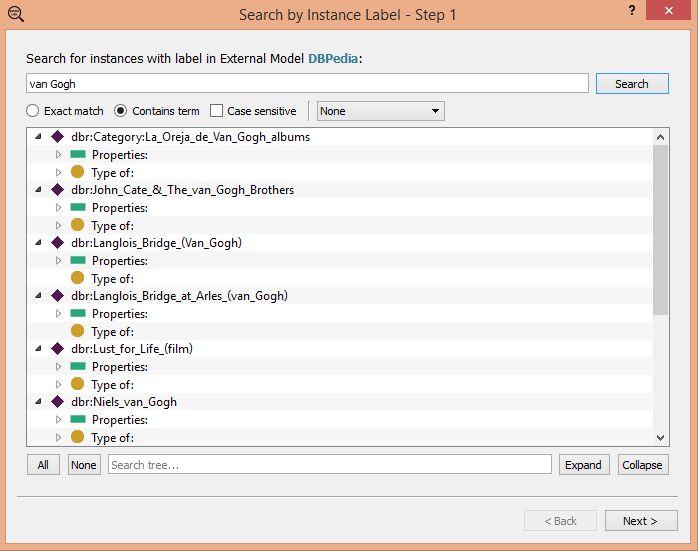
Fig.11: Results when searching for instances that contain term ‘van Gogh’ (case insensitive) in label, with no specific language declaration.
When the Search button is clicked, an rdfs:label-based search is executed and results from the endpoint are displayed in a form of a tree diagram; parent nodes are found instances, and child nodes are properties/values in detail, together with type(s) of each retrieved instance.
As seen in previous figures, results may differ according to the user’s defined parameters. A careful examination of instances’ type should be made manually, in order to either select the instance(s) of interest to be populated in MM ontology, or to re-apply a new search. For the current example, let’s consider selecting the instance named dbr:Vincent_van_Gogh (see Fig.10), whose class type is (among others) of dbo:Agent, dbo:Artist, foaf:Person, yago:DutchPainter, etc. In the next step of the wizard (Fig.12), the user may select from a drop-down list, the MM class where the new instance(s) will be imported to.
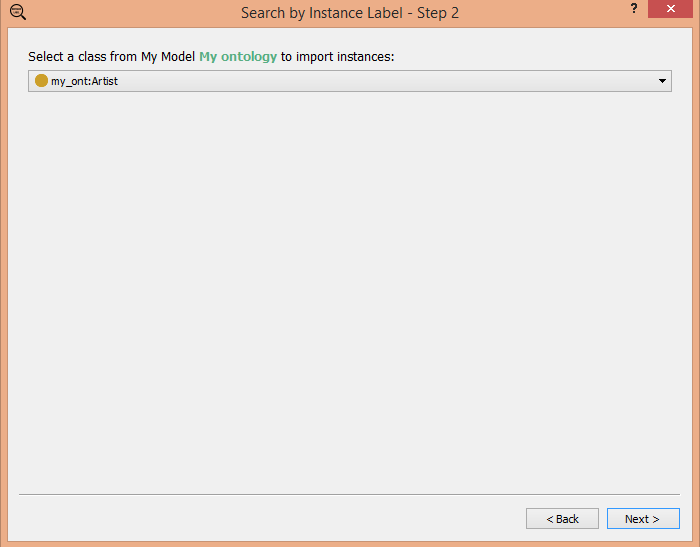
Fig.12: Define the class in MM where new instances will belong to.
In order for PROPheT to proceed with the selected instantiation(s) in MM, an ontology mapping process should be performed (for more details, see Ontology mapping section). In our example, the user proceeds with the mapping step (Fig.13), by adding new pairs of EM / MM matching properties or by altering already existing ones that are automatically retrieved from PROPheT’s database when current page of wizard is displayed.
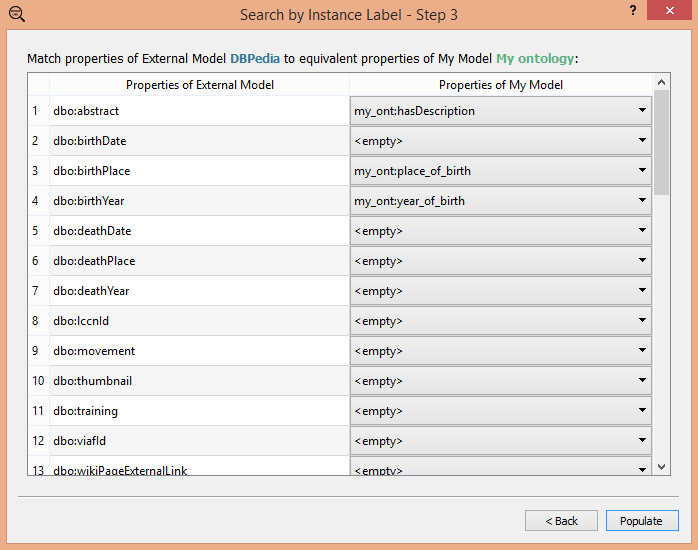
When the user finalizes his/her selections in Mapping table, he/she may click the Populate button to complete the process. A final information page is shown (Fig.14) and after exiting the wizard, PROPheT returns to its initial display window, where current content of ontology with new instances is shown (Fig.15).
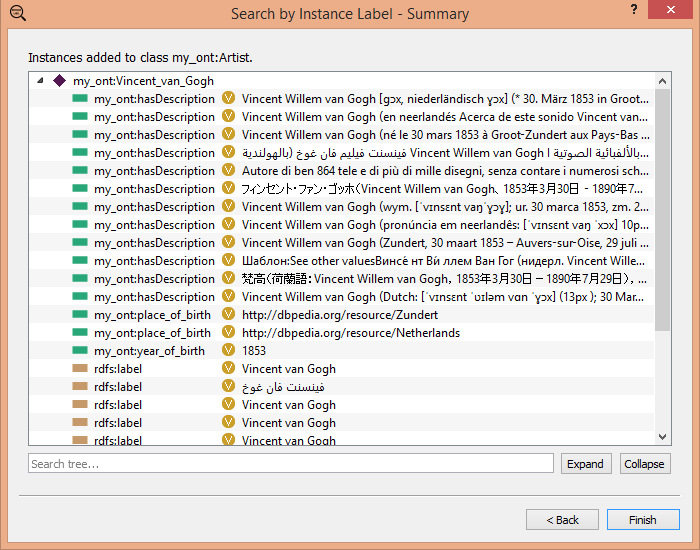
Fig.14: Summary of current Search by instance label process in PROPheT.
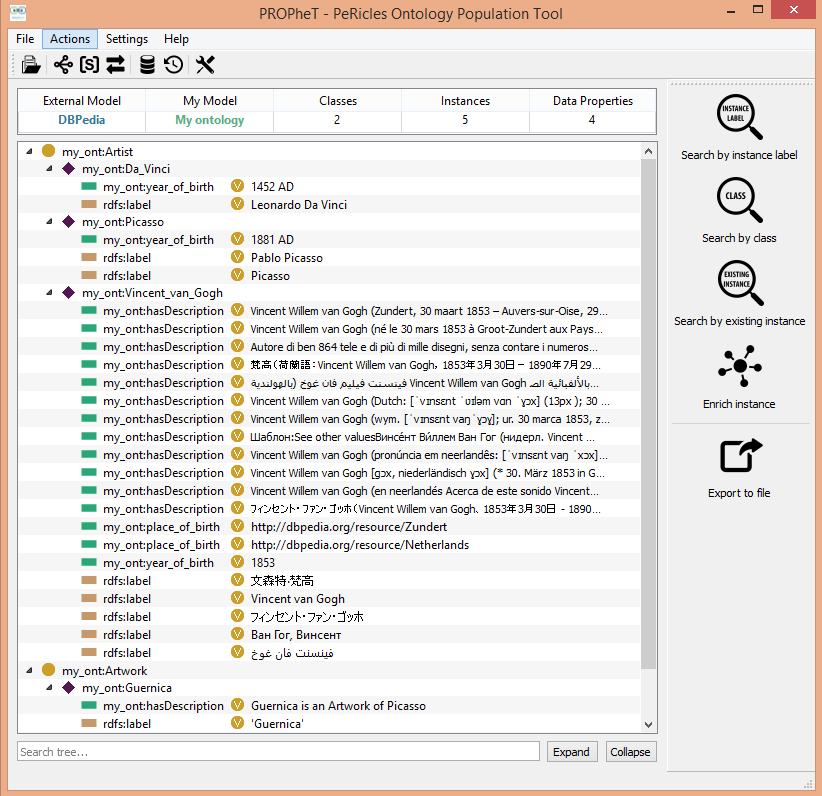
Fig.15: New instance my_ont:Vincent_van_Gogh is displayed in Graph Area of PROPheT’s main window.
| [7] | https://en.wikipedia.org/wiki/Vincent_van_Gogh |
Search by Class
In order to perform a search based on a user-defined class, the user has to:
Have already loaded the ontology to be populated (see Load an ontology section).
Confirm that the selected endpoint is the one needed to be queried for new instances (see Select endpoint section).
Refine (if needed) the general parameters (see Define general parameters section).
Run the Search by class wizard in PROPheT (menu Actions > Search endpoint by class or by clicking the
 button in Main Functions Toolbar), where additional steps will be followed:
- Select the prefix and type the name of class to search for instances in EM.
- Select one or more instances from the derived results or, if no results found, go to previous step of wizard and perform a new search.
- Define a class in MM as the type (
rdf:type) of selected to be populated instances. - Do the mapping between available EM and MM datatype properties.
- Press the Populate and then the Finish button.
Search by Class - In detail
This method populates new instances in MM “from-scratch”, by searching for specific user defined types of classes in EM. Τhe user has to know the exact type of class (prefix and classname for the EM ontology) where wanted instances belong. An example search in DBpedia could be the dbo:Artwork [8] class, as seen in Fig.16.
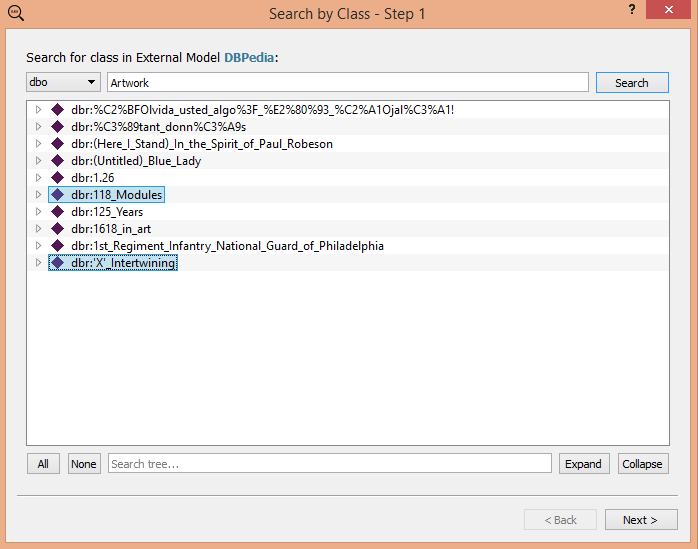
Fig.16: Results derived when searching for instances that belong to dbo:Artwork class. Highlighted instances were selected by user to be populated in MM.
In the current case, the software performs SPARQL queries to the EM endpoint and returns a list of corresponding instances that belong to the specified class, if possible. The number of responses from EM may be limited by setting the value of the corresponding parameter in the Preferences window.
Similarly to previously described population process, the user may select from the results one or more instances that he/she wishes to populate (see selection in Fig.16) under an existing MM class (Fig.17). Then, a user-driven Ontology mapping should be performed (Fig.18): the already existing mapping relations between current EM and MM will be retrieved from PROPheT’s database and the user may keep or alter any of them according to his/her needs.
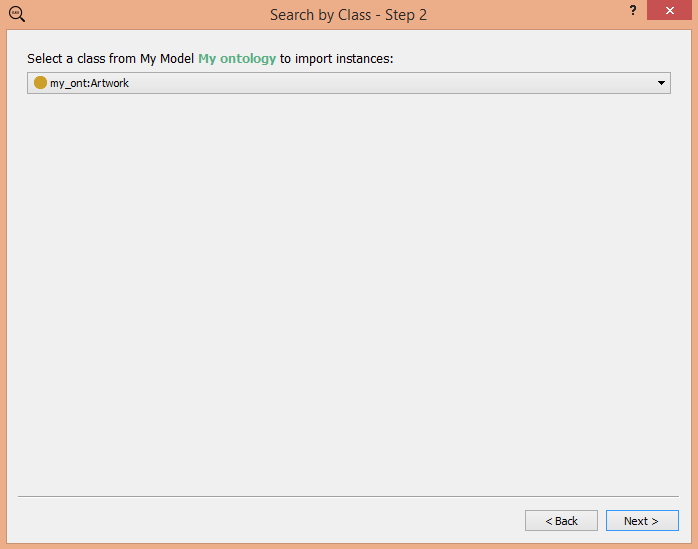
Fig.17: Define the class in MM where new instance(s) will belong to.
As a final step, new instances will be added in the MM ontology by clicking the Populate button. A summary of the process is given (Fig.19) and then user may exit the wizard and return to the main window of PROPheT.
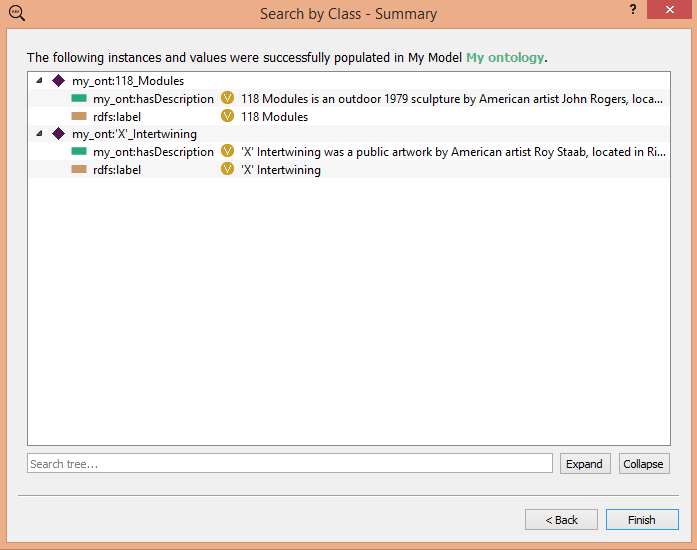
Fig.19: Summary of current Search by Class process in PROPheT.
An overview of current status of MM ontology is displayed in Fig.20, where newly populated instances (my_ont:118_Modules and my_ont:‘X’_Intertwining) have values for properties:
my_ont:hasDescription, which was mapped by user withdbo:abstract, andrdfs:labelsince relevant parameter was defined in General tab of Preferences window (more details in Define general parameters section).
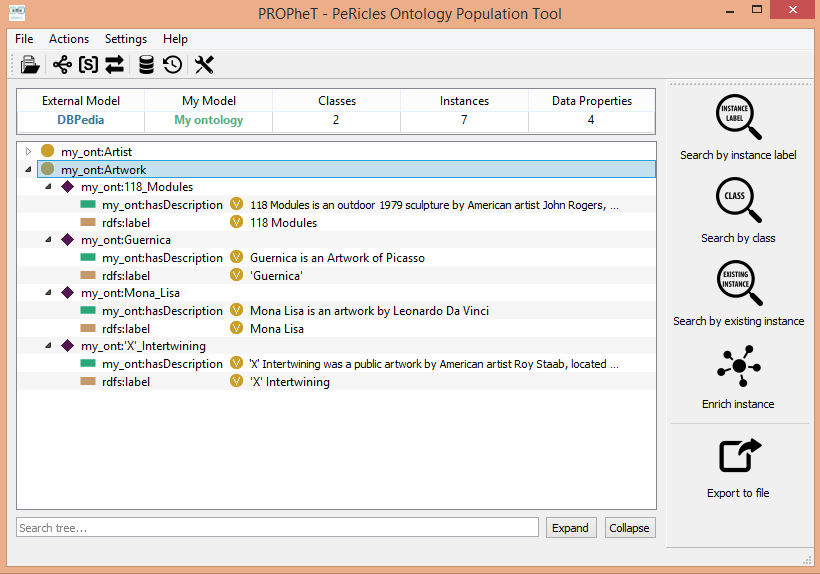
Fig.20: Overview of current MM ontology, where newly populated instances my_ont:118_Modules and my_ont:‘X’_Intertwining belonging to my_ont:Artwork class are displayed.
| [8] | dbo is the prefix for a specific DBPedia namespace, that is http://dbpedia.org/ontology |
Search by existing Instance
In order to perform a search based on a user-defined class, the user has to:
Have already loaded the ontology to be populated (see Load an ontology section).
Confirm that the selected endpoint is the one needed to be queried for new instances (see Select endpoint section).
Refine (if needed) the general parameters (see Define general parameters section).
Run the Search by existing instance wizard in PROPheT (menu Actions > Search endpoint by existing instance or by clicking the
 button in Main Functions Toolbar), where additional steps will be followed:
- Select an instance, the label (
rdfs:label) of which will be used by PROPheT to search for classes that contain instances with the same label; if the selected instance has no label, then select a different instance or exit wizard and perform a different type of search in PROPheT. - Select one or more classes from the derived results to view their corresponding instances in the next step.
- Select one or more instances from any of the previously selected classes to be populated in MM.
- Define a class in MM as the type (
rdf:type) of selected to be populated instances. - Do the mapping between available EM and MM datatype properties.
- Press the Populate and then the Finish button.
- Select an instance, the label (
Search by existing Instance - In detail
As an example, we select the existing instance named my_ont:Picasso (Fig.21), to query the endpoint for similar instances. In this case, PROPheT performs an rdfs:label-based search and finds EM classes that include an instance with the same instance label as the one in MM. If search produces results, the user may then select the classes of his/her interest, view their corresponding instances and choose which of them will be imported to MM. Examples of all actions in the wizard are shown in following figures (Fig.22 , Fig.23 , Fig.24 , Fig.25, Fig.26).
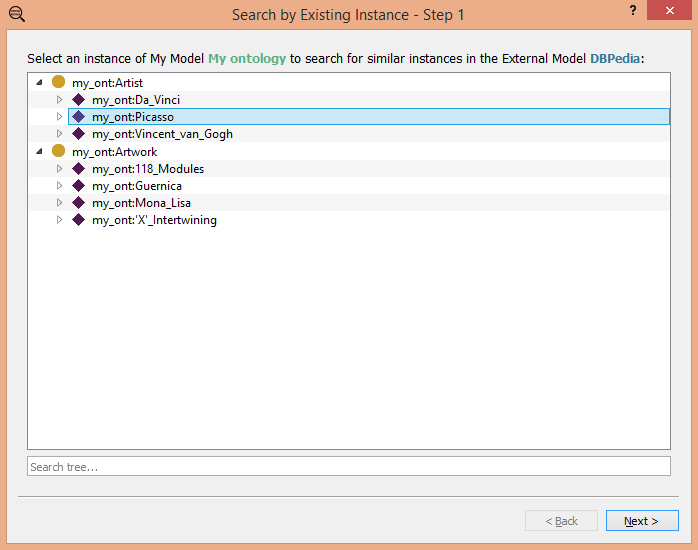
Fig.21: Selecting an existing instance to search for similar instances in EM, the rdfs:label of which is ‘Picasso’.
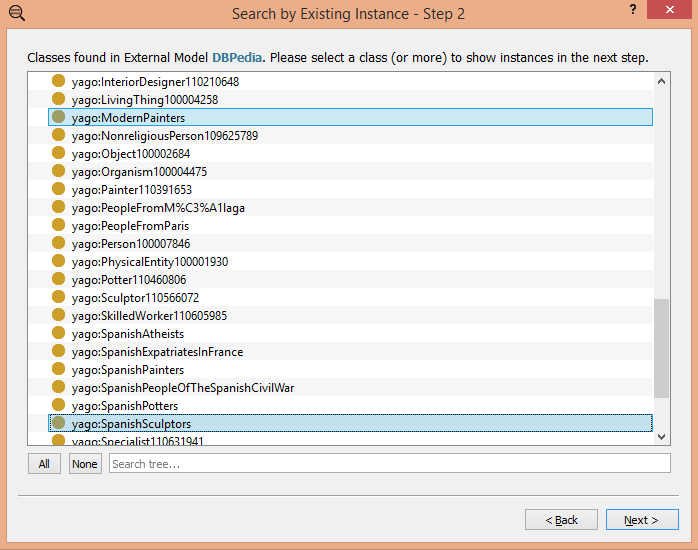
Fig.22: Classes found in DBPedia with instances that have rdfs:label ‘Picasso’. User selects yago:ModernPainters and yago:SpanishSculptors to continue with the process.
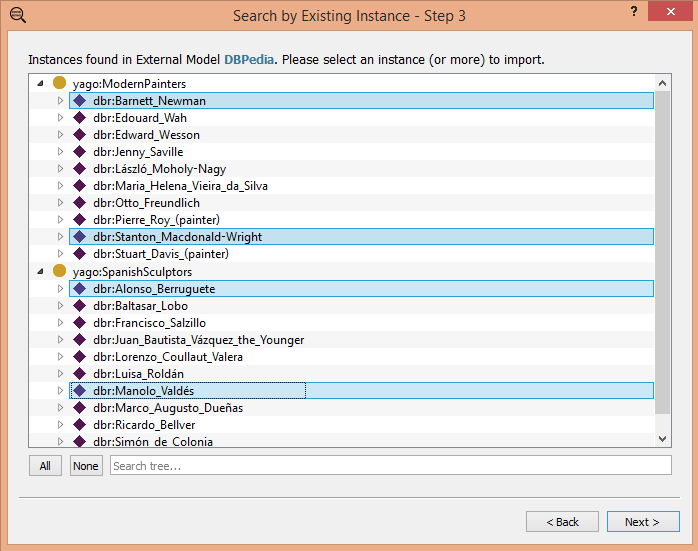
Fig.23: Instances selected by user to be populated in MM as my_ont:Artist.

Fig.24: Define the class in MM where new instance(s) will belong to.
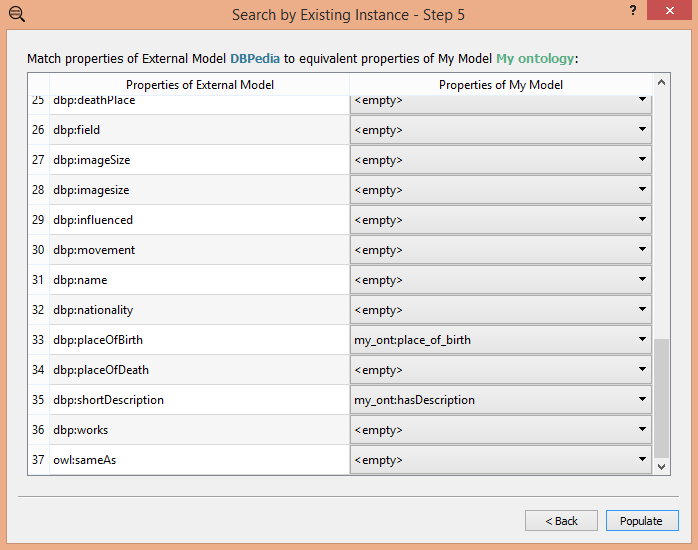
Fig.25: An indicative screenshot from the user-driven Ontology mapping process in PROPheT.

Fig.26: Summary of current Search by existing instance process in PROPheT.
Enrich existing Instance
In order to enrich an existing instance with additional data properties and values derived from corresponding instance in EM, the user has to:
Have already loaded the ontology to be populated (see Load an ontology section).
Confirm that the selected endpoint is the one needed to be queried for new instances (see Select endpoint section).
Refine (if needed) the general parameters (see Define general parameters section).
Run the Enrich instance wizard in PROPheT (menu Actions > Enrich instance or by clicking the
 button in Main Functions Toolbar), where additional steps will be followed:
- Select an existing instance from MM; if the selected instance has no label, then select a different instance or exit wizard and perform a different type of search in PROPheT.
- Select one or more entries of property/value pairs from the derived results to be added in existing instance; results are categorized per instances found in EM.
- Do the mapping between available EM and MM datatype properties.
- Press the Populate and then the Finish button.
Enrich existing Instance - In detail
This type of functionality gives the user the ability to enrich an already existing instance within MM with properties and values derived from other instances in EM that have the same (i.e. exact match) rdfs:label. Let’s consider a case where we want to enrich the existing instance my_ont:Picasso (Fig.27). The user selects the corresponding instance in the wizard and clicks the Next button to initialize the search process.
Results are given in a form of a tree diagram, with all retrieved instances, properties and values. Potentially, the derived instances may belong to one or more different classes in EM (Fig.28); the software tracks and presents to the user the defined rdf:type property declarations for these instances. Based on the content and the semantics of the derived instances, the user may decide which pair(s) of property-value he/she wants to import to the MM for the initially selected instance. An indicative selection can be seen in Fig.28.
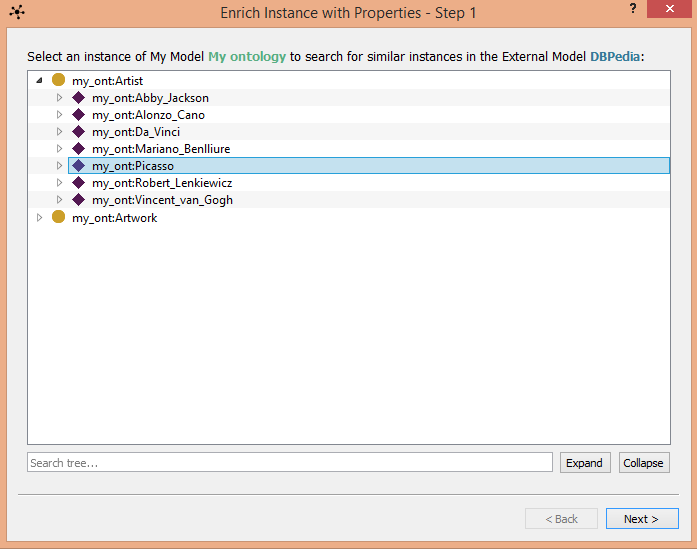
Fig.27: Selected instance to be enriched..
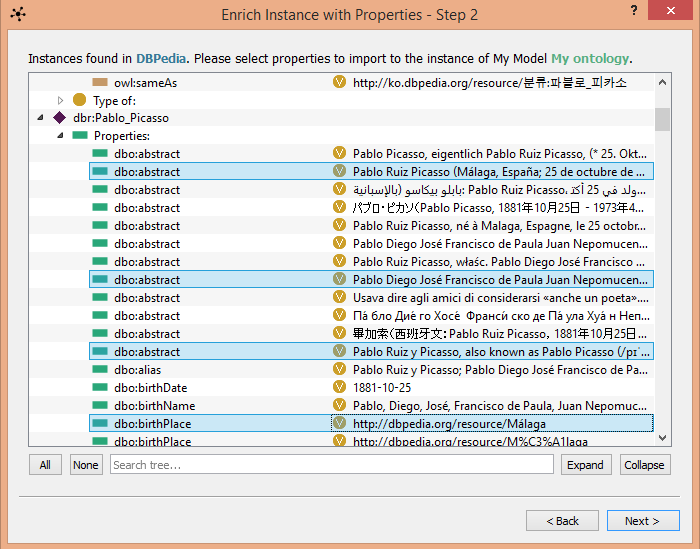
Fig.28: Part of selections made by user that will be instantiated as new property/value pairs in my_ont:Picasso.
Similarly to the aforementioned search methods, an Ontology mapping process should be performed in order for the new properties and values to be instantiated properly in the existing instance (Fig.29). When the user clicks the Populate button, a summary of current instantiations is given in the last page of wizard (Fig.30).
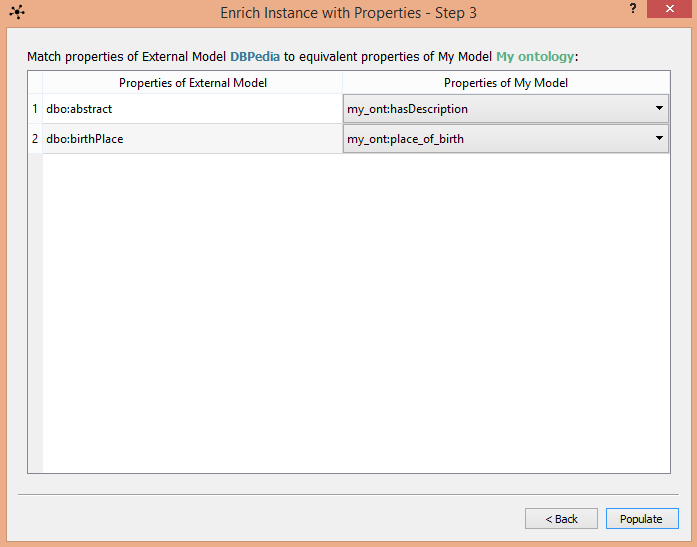
Fig.29: Mapping all unique properties selected in previous step of wizard.

Fig.30: Summary of populated properties/values for my_ont:Picasso, through Enrich an existing instance wizard.